Developer Portal Configuration
API Control Plane administrators can publish up to 10 active Boomi-managed Developer Portals. Each developer portal can be uniquely configured, branded, and governed to serve different API product strategies. In addition to Boomi-managed Developer Portals, administrators can create and manage an unlimited number of Developer Portals on their own infrastructure.
Create a Boomi-managed Developer Portal
To create a Boomi-managed developer portal, do the following:
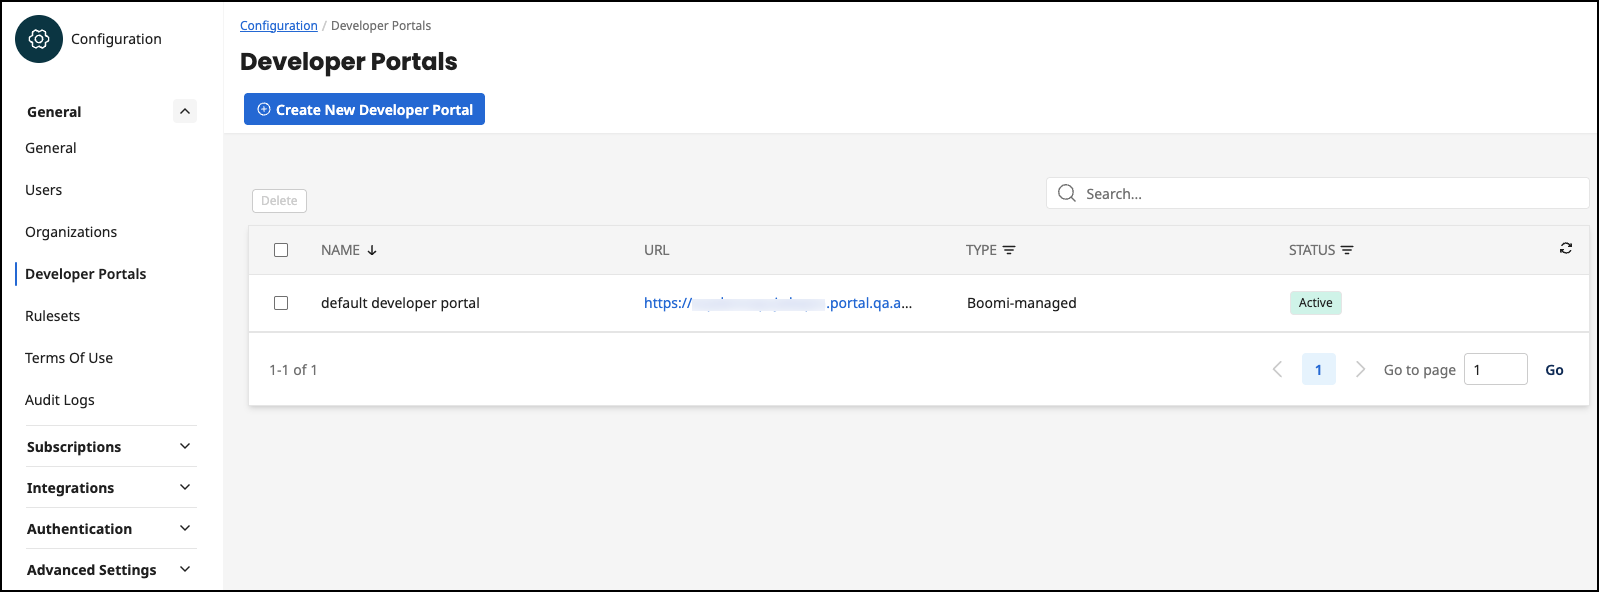
- In the API Control Plane Administration Portal, select Configuration > Developer Portals. A Boomi-managed developer portal named
default developer portalis provided with each account.- To configure the default developer portal, select it. Configuration information is at Developer Portal Details.
- Select Create New Developer Portal.
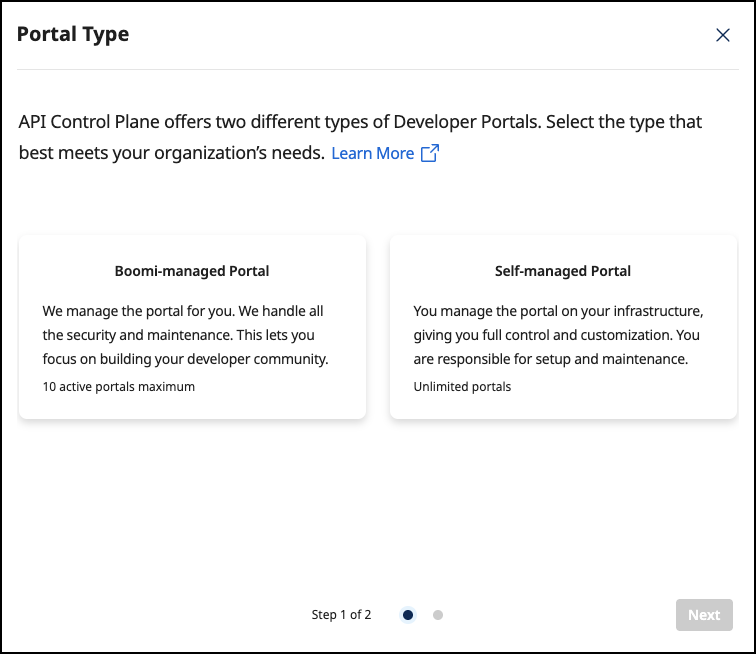
- Select Boomi-managed Portal.
-
Select Next.
-
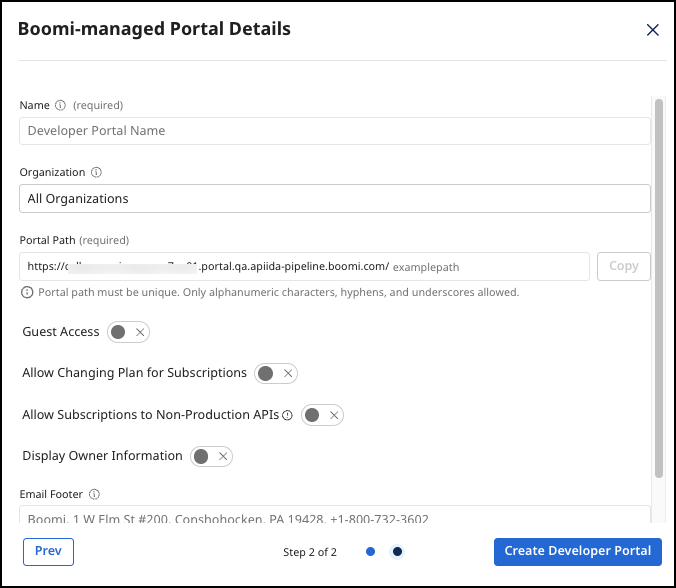
Add the following information:
-
Name - The name of the Developer Portal is displayed in the login screen.
-
Organization - If the organization is set for a Developer Portal, this Developer Portal is exclusive for this organization and has an impact on the visibility of APIs.
-
Portal Path - The URL of the Developer Portal. The default Developer Portal URL is
https://<tenantID>.portal.na.controlplane.boomi.com/defaultnoteThe following words cannot be used in the portal path:
welcome,auth,samlresponse,acceptinvitation,resetpassword,apis,apiproducts,applications,settings,users. -
Guest Access - You can enable/disable the guest access in the Developer Portal.
- If disabled, a user must log in. Except for the login screen, there is no function for users who are not logged in.
- If enabled, users can access the home page and list of APIs of their Developer Portal without login. The list of available APIs in guest mode is composed of all published APIs that have the visibility setting Public. Guests can register in their Developer Portal to subscribe to APIs.
-
Allow Changing Plan for Subscriptions - Allow users in the Developer Portal to switch the plan of a subscription at a later date without having to delete and recreate the subscription. No approval request is triggered.
-
Allow Subscriptions to Non-Production APIs - False by default. If enabled, allows subscriptions to non-production APIs.
-
Display Owner Information - If enabled, the owner information organization name and organization email is displayed in each overview of API and API product.
-
Email Footer - The footer of all emails sent by the developer portal. For example, an email is sent when a user is invited to the developer portal.
- Select Create Developer Portal.
- Customize your developer portal. You can use our provided template to build upon and customize your Developer Portal according to your own needs. Refer to Customization.
Create a Self-managed Developer Portal
To create a Self-managed developer portal, do the following:
-
In the API Control Plane Administration Portal, select Configuration > Developer Portals.
-
Select Create New Developer Portal.
- Select Self-managed Portal.
-
Select Next.
-
Add the following information:
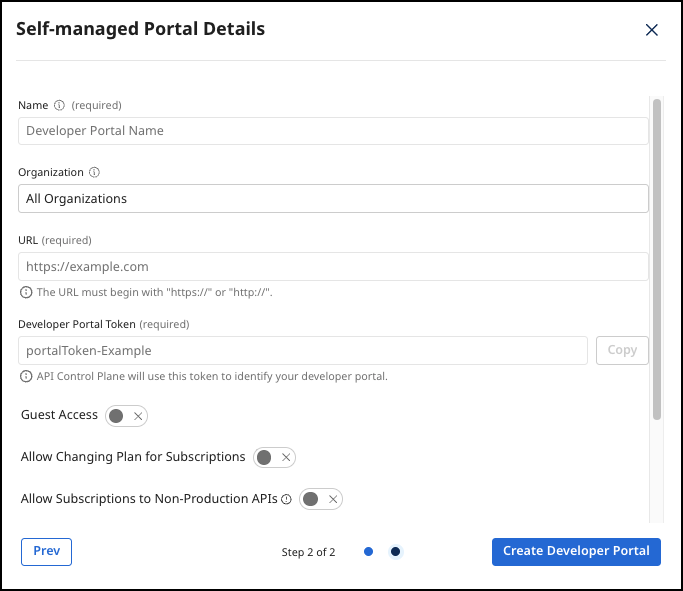
- Name - The name of the Developer Portal is displayed in the login screen.
- Organization - If the organization is set for a Developer Portal, this Developer Portal is exclusive for this organization and has an impact on the visibility of APIs.
- URL - The URL of the developer portal. URLs must be unique across developer portals.
- Developer Portal Token - A unique token you define that identifies the developer portal. Only alphanumeric characters, hyphens, and underscores are allowed. You will need this token in a later step.
- Guest Access - You can enable/disable the guest access in the Developer Portal.
- If disabled, a user must log in. Except for the login screen, there is no function for users who are not logged in.
- If enabled, users can access the home page and list of APIs of their Developer Portal without login. The list of available APIs in guest mode is composed of all published APIs that have the visibility setting Public. Guests can register in their Developer Portal to subscribe to APIs.
- Allow Changing Plan for Subscriptions - Allow users in the Developer Portal to switch the plan of a subscription at a later date without having to delete and recreate the subscription. No approval request is triggered.
- Allow Subscriptions to Non-Production APIs - False by default. If enabled, allows subscriptions to non-production APIs.
- Display Owner Information - If enabled, the owner information organization name and organization email is displayed in each overview of API and API product.
- Email Footer - The footer of all emails sent by the developer portal. For example, an email is sent when a user is invited to the developer portal.
-
Select Create Developer Portal.
-
Get the Docker image for your Developer Portal. Boomi provides the image and recommends using Docker to host it.
docker pull apiida/controlplane-devportal -
Configure your developer portal using the following
docker-compose.ymlscript:
services:
  obsidian-devportal:
    image: apiida/controlplane-devportal
    container_name: joshn-doe-api-shop
    ports:
      - "3009:443"
    environment:
      BACKEND_URL: https://<tenant>.backend.na.controlplane.boomi.com
      DEV_PORTAL_TOKEN: vpfw2d823h8uQRN
      TINY_EDITOR_API_KEY: YourEditorKey
      # ssl configuration - here you can mount your certificate in the container and if you want, also change the whole nginx configuration.
      # volumes:
      #   - ./frontend.crt:/etc/ssl/certs/devportal.crt
      #   - ./frontend.key:/etc/ssl/private/devportal.key
      # http://nginx.org/en/docs/
      #   - ./nginx.conf:/etc/nginx/conf.d/default.conf
Environment Variables
| Variable | Default Value | Description |
|---|---|---|
BACKEND_URL | https://localhost:8080 | The public URL of your Control Plane backend. This must be accessible from your browser. For example: https://<tenant>.backend.na.controlplane.boomi.com |
SUPPORT_URL | http://community.boomi.com | The link to the support portal. Is displayed as a button in the main menu and on the 'Not Found' page. |
DEV_PORTAL_TOKEN | The token of the Developer Portal, as set in a previous step. | |
NGINX_PORT_SSL | 443 | Nginx Port with SSL. |
NGINX_PORT | 80 | Nginx Port without SSL. |
TINY_EDITOR_API_KEY | You must create and provide your own tiny api key here. This is free of charge. Quick setup guide: get your TinyMCE API key in 5 minutes |
-
Execute the following command in the console where your
docker-compose.ymlis located:docker compose up -d -
Go to your new Developer Portal:
https://localhost:3009/auth -
Customize your developer portal. You can use our provided template to build upon and customize your Developer Portal according to your own needs. See Customization.
Visibility
Users can log into a Developer Portal if they are part of the Organization, but they can only view APIs and API Products that they are assigned visibility to.
Enable Anonymous Access
To enable anonymous access to the developer portal, go to Configuration > Developer Portal.
The guest does not have to log in anymore, but also cannot see all APIs. More about this in API Product Visibility.
